This post is intended to guide you with the required installation steps for SCCM 2012. We are assuming a simple install with a unique Primary Site Server and a remote SQL Database Server with a named instance.
For this tutorial we will take 6 main Steps:
Step1 - The LAB enviroment
Step2 - Extend Active Directory Schema
Step3 - System Container creation and Permissions Assignment
Step4 - Site Server Prerequisites
Step5 - SQL Server considerations
Step6 - SCCM 2012 intallation
For this tutorial we will take 6 main Steps:
Step1 - The LAB enviroment
Step2 - Extend Active Directory Schema
Step3 - System Container creation and Permissions Assignment
Step4 - Site Server Prerequisites
Step5 - SQL Server considerations
Step6 - SCCM 2012 intallation
Step1 - The LAB enviroment
For this LAB, we setup an Active Directory infra-structure with the following characteristics:
TSTDC1.lab.local -> A domain controller for the domain lab.local
TSTSCCM.lab.local -> The site server machine witch will host the Site Server role and most of the system roles
TSTSQL.lab.local -> The SQL Server machine, witch will host the Database System role and the Reporting Services Point role. The SQL Server version installed is SQL Server 2008 SP2 with CUP7. A named instance called SMSIST1 is setup and ready to use
CLT01.lab.local -> A Windows 7 client machine that represents the common users computers in a domain
All Server systems are running Windows Server 2008 R2 SP1.
All computer are join to the domain lab.local
We also create some domain accounts for various purposes:
SQL_SA -> a domain user account used for SQL server services
SCCM_SA -> a domain user account for use in various SCCM services, like, push install, Network Access Account, etc
SCCMadmin -> a domain user account with admin rights in the SCCM infra-structure
Reports_SA -> a domain user account for use with reporting services
NOTE: We may not be using all mention accounts in this guide, this is just a simple and basic creation of Active Directory accounts for a SCCM enviroment
Step2 - Extend Active Directory Schema
Extending Active Directory Schema for SCCM 2012 is a simple process that consists in running an exe file in one of you Domain Controllers. As there aren't any changes in the Schema extensions since SCCM 2007, if you have previously upgrade your AD Schema with this extensions you do not need to Upgrade it again.
To extend the AD Schema follow this steps:
1. Logon to a Domain Controller with an account that have Domain and Schema Admin privileges
2. Access the SCCM 2012 media content, by network browse or directly from the DVD.
3. Navigate to \SMSSetup\Bin\x64\ and execute Extadsch.exe

4. Verify the log file generated in c:\ ExtADSch.log to confirm that the upgrade was successful

5. If applicable, wait for the Active Directory Replication to take place or force it with repadmin tool or Active Directory Sites and Services snap-in
Step3 - System Container creation and Permissions Assignment
Now we need to create a new container under Active Directory System Container, and then we need to assign Full Control permissions in this container for each Site Server computer account. In our case we are only installing a Primary Site Server, so we just need to assign permission to one computer object (TSTSCCM).
1. From a Domain Controller with a Domain Administrator account open ADSI Edit snap-in (adsiedit.msc)
2. Select the top node of the left pane, right click and choose connect to, accept the default naming context and click OK.
3. In the container CN=System, right click and select new -> object


4. Choose Container in the Class type menu and hit next


5. In the value field for the container object write System Management and press next

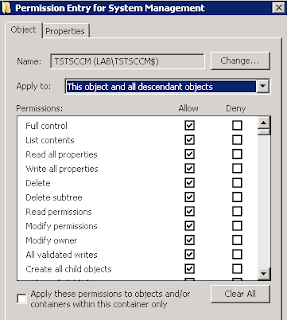
Now that the System Management Container it´s created we need to give Full Control permission on this container and in all his descendant objects to every Site Server computer account. To do this follow this steps:
1. Again from ADSI Edit select the System Management Container, go to it´s properties
2. In the security tab add the Site Server computer account to the ACL and assign full control permissions to it


4. In the permission entry for System Management windows, from the Apply to drop dwon box menu choose This object and all descendant objects, click OK all the way down until all windows are closed.

5. Again, wait or force replication between Domain Controllers if applicable
Step4 - Site Server Prerequisites
So, our Active Directory preparations tasks are done, now we focus on the Site Server preparation. As mentioned we are going to install a stand alone Primary Site Server. For that, we need to install a bunch of feature and application in the Site Server computer (TSTSCCM).
You can review the prerequisites for the various roles here, to simplify the process we will just run a power shell command to install all the features we need in one shoot.
1. On your Site Sever computer, open a power shell command prompt and type:
Import-module servermanager <enter>
Add-WindowsFeature Web-Common-Http,Web-Static-Content,Web-Default-Doc,Web-Dir-Browsing,Web-Http-Errors,Web-Http-Redirect,Web-Asp-Net,Web-Net-Ext,Web-ASP,Web-ISAPI-Ext,Web-ISAPI-Filter,Web-Http-Logging,Web-Log-Libraries,Web-Request-Monitor,Web-Http-Tracing,Web-Basic-Auth,Web-Windows-Auth,Web-Url-Auth,Web-Filtering,Web-IP-Security,Web-Stat-Compression,Web-Mgmt-Tools,Web-WMI,NET-Framework,RDC,BITS -Restart <enter>
Add-WindowsFeature Web-Common-Http,Web-Static-Content,Web-Default-Doc,Web-Dir-Browsing,Web-Http-Errors,Web-Http-Redirect,Web-Asp-Net,Web-Net-Ext,Web-ASP,Web-ISAPI-Ext,Web-ISAPI-Filter,Web-Http-Logging,Web-Log-Libraries,Web-Request-Monitor,Web-Http-Tracing,Web-Basic-Auth,Web-Windows-Auth,Web-Url-Auth,Web-Filtering,Web-IP-Security,Web-Stat-Compression,Web-Mgmt-Tools,Web-WMI,NET-Framework,RDC,BITS -Restart <enter>

2. Download and install .NET Framework 4 - here
3.There are some optional windows features / roles that you could install, depending on what kind of functionality you want to use from SCCM, for example, if you plan on using Software Updates you will need the WSUS role installed on the site system you install the SCCM SUP (Software Update Point) role, likewise if you plan on using OSD (Operating System deployment), you will need the WDS (Windows Deployment Services) installed. In our case we will just add this roles in a later time, note that for WDS, you don´t need to install the role manually like WSUS, in SCCM 2012, the role is installed automatically once you enable the PXE role.
3.There are some optional windows features / roles that you could install, depending on what kind of functionality you want to use from SCCM, for example, if you plan on using Software Updates you will need the WSUS role installed on the site system you install the SCCM SUP (Software Update Point) role, likewise if you plan on using OSD (Operating System deployment), you will need the WDS (Windows Deployment Services) installed. In our case we will just add this roles in a later time, note that for WDS, you don´t need to install the role manually like WSUS, in SCCM 2012, the role is installed automatically once you enable the PXE role.
4. Add the Site Server computer account (TSTSCCM) and the SCCMadmin user to the local administrators group of your Primary Site Sever computer (TSTSCCM).

This should install all the main prerequisites you need for your Primary Site Server installation
Step5 - SQL Server considerations
Has told, we are using a separate server for hosting the SQL server Database and the Site System Database role. We also decide to use a named instance for SMS Database, witch intern needs some additional configurations compared with using just the default instance.
We are not going to do a step by step on how to install SQL, we are just going to mention some relevant aspects that you need to take in consideration when building you SQL Sever.
1. You could see the supported versions of SQL Server here
2. You only need to install the Database Engine feature for each site server, of course Management Tools could come in handy, Reporting Services is optional, but you probably would install it, since reporting in SCCM 2012 is only through Reporting Services, no more Reporting point role :)


3. You must use a dedicated instance of SQL Server for each site, in other words, you cannot host two Database from two different Site Servers in the same SQL instance, it could be in the same server though, but in separated instances
4. Limit SQLServer memory to 80 - 90% of the addressable memory if the SQL is in a dedicated Server. if the SQL is co-located with the Site Server computer limit the memory to 50 - 80%. You can do this with SQL Server Management Studio, by selecting the top SQL Server instance node, going to it´s properties, and in the memory page define a limit for the maximum server memory


5. If you configure you SQL Server service to run with a domain user account (best practice) you might have to register a SPN (Service Principal Name) in Active Directory for that domain account. You will need to register two SPN for the account, one for the NETBIOS name of the SQL Server and other for the FQDN. to do that, on a domain controller, open a command prompt and type:
setspn –A MSSQLSvc/<SQL Server NETBIOS name>:1433 <Domain\Account>
setspn –A MSSQLSvc/<SQL Server FQDN>:1433 <Domain\Account>
in our example we have:
setspn –A MSSQLSvc/TSTSQL:1433 LAB\SQL_SA
setspn –A MSSQLSvc/TSTSQL.lab.local:1433 LAB\SQL_SA
After registering the SPN´s you could check them by typing:
setspn –L <domain\SQL Service Account>
once again in our example:
setspn –L LAB\SQL_SA
6. Open Firewall ports on you SQL server, you could just turn off Windows Firewall, however if you like to take advantage of windows firewall security just ensure you open the necessary ports, the script below will do that for you, just copy and paste it in a notepad, save it as a *.bat file, and run it from a command prompt
@echo ========= SQL Server Ports ===================
@echo Enabling SQLServer default instance port 1433
netsh firewall set portopening TCP 1433 "SQLServer"
@echo Enabling Dedicated Admin Connection port 1434
netsh firewall set portopening TCP 1434 "SQL Admin Connection"
@echo Enabling conventional SQL Server Service Broker port 4022
netsh firewall set portopening TCP 4022 "SQL Service Broker"
@echo Enabling Transact-SQL Debugger/RPC port 135
netsh firewall set portopening TCP 135 "SQL Debugger/RPC"
@echo ========= Analysis Services Ports ==============
@echo Enabling SSAS Default Instance port 2383
netsh firewall set portopening TCP 2383 "Analysis Services"
@echo Enabling SQL Server Browser Service port 2382
netsh firewall set portopening TCP 2382 "SQL Browser"
@echo ========= Misc Applications ==============
@echo Enabling HTTP port 80
netsh firewall set portopening TCP 80 "HTTP"
@echo Enabling SSL port 443
netsh firewall set portopening TCP 443 "SSL"
@echo Enabling port for SQL Server Browser Service's 'Browse' Button
netsh firewall set portopening UDP 1434 "SQL Browser"
@echo Allowing multicast broadcast response on UDP (Browser Service Enumerations OK)
netsh firewall set multicastbroadcastresponse ENABLE
7. During SQL installation in the collation tab, you should set the Database Engine to use SQL_Latin1_General_CP1_CI_AS


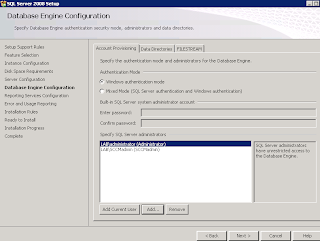
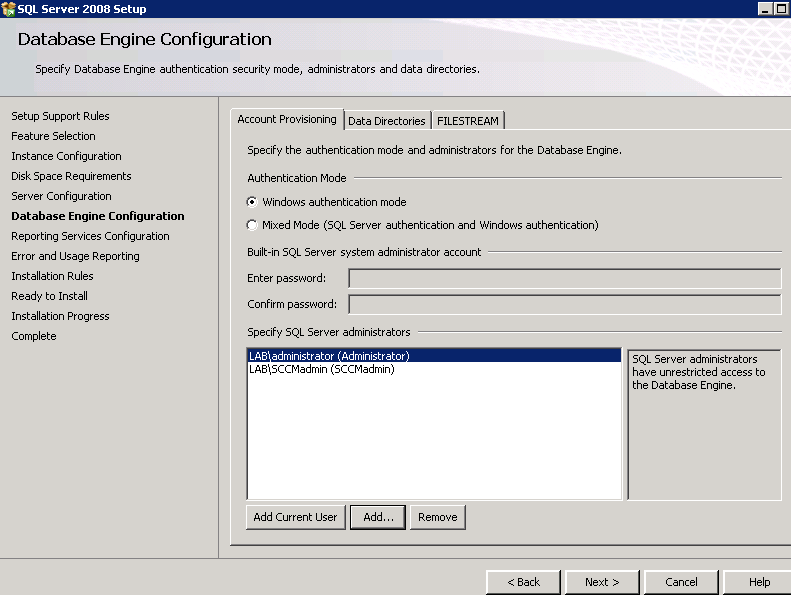
8. During SQL server installation in the account provisioning tab, you should set the authentication mode to Windows Authentication and in the SQL Server Administrators add the SCCMadmin user and the current user from witch you are installing SQL.
9. As we told, when using a named instance you do need to make same additional configurations. SCCM Site Server do not support Dynamic Ports, and SQL Server named instances use dynamic ports by default, so we need to fix that.
a. Logon to your SQL Server and open SQL Server Configuration Manager
b. Expand SQL Server Network Configuration, select Protocols for "you instance name". From the central pane, double click on TCP/IP protocol
c. In TCP/IP Properties windows select the IP Addresses tab
d. Now for every IP configuration, from IP1 through IPAll, delete the "0" in the TCP Dynamic Ports field, leaving it just empty and fill in the TCP Port of every IP with the value of 1433. Click OK to close the window

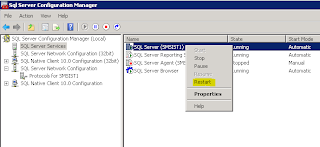
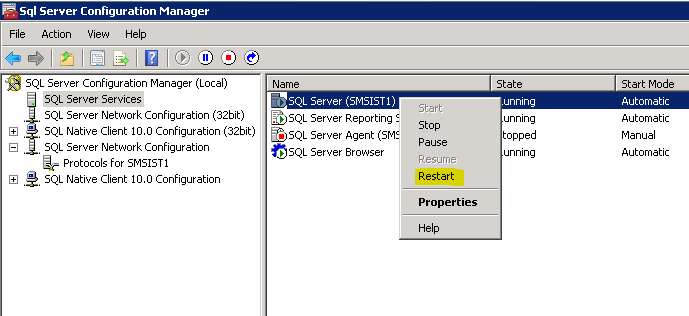
e. To apply the changes, go to SQL Server Services node, select your SQL Server instance and do a restart to the service
10. Add the Site Server computer account (TSTSCCM) and the SCCMadmin user to the local administrators group of the SQL Server (TSTSQL)
b. Expand SQL Server Network Configuration, select Protocols for "you instance name". From the central pane, double click on TCP/IP protocol
c. In TCP/IP Properties windows select the IP Addresses tab
d. Now for every IP configuration, from IP1 through IPAll, delete the "0" in the TCP Dynamic Ports field, leaving it just empty and fill in the TCP Port of every IP with the value of 1433. Click OK to close the window

e. To apply the changes, go to SQL Server Services node, select your SQL Server instance and do a restart to the service
10. Add the Site Server computer account (TSTSCCM) and the SCCMadmin user to the local administrators group of the SQL Server (TSTSQL)
11. Make sure you have all necessary SQL patches, the minimum Service Packs and CU (Cumulative Updates)
Step6 - SCCM 2012 intallation
Active Directory is prepared our Site Server prerequisites installed and our SQL Server up and running, we are finally ready to kick the SCCM installation.
From your Site Server computer, with your SCCMadmin account follow this steps:
1. Navigate to your installation media and execute splash.hta
2. In the configuration Manager Setup windows click install


3. In the Getting Started window, select Install a Configuration Manager Primary Site and click next


4. In the prerequisites licenses page accept all three license terms and click next

5. In the prerequisites download page, specify a local folder to download all the necessary additional files for the installation and click next. Wait for the download to complete

6. In the server language selection window, select the languages you want to install for your console and reports, click next

7. In the client languages selection window, select the languages you want to be available for you clients, click next

8. In the site and installation setting page, specify the 3 digit Site Code for your Site Sever, we are using LB1 in our LAB. Fill in a site name for your Primary Site Server, specify the installation path and choose whether or not to install the SCCM console on the Site Server, witch you probably would want to. click next

9. In the primary site server installation window, just select whether you are going to join the Site Server to an existing hierarchy in witch case you must specify the CAS Server FQDN, or whether to perform a Stand Alone install, note that if you choose a Stand Alone install, you can not join the Primary Site Server later to a hierarchy. In our scenario we are going to install a stand alone Primary Site. click next

10. In the Database information page enter your Database location information, SQL Server Database FQDN name, instance name (leave blank if you are using the default instance) we are using a named instance called SMSIST1. You should accept defaults for the Database name and for the SSB port, click next

11. In the SMS Provider Setting specify the SMS Provider FQDN, this probably would be you Site Server, click next

12. In the client computer communication settings, choose configure the communication method in each site system role, click next

13. In the site system role, check the Install a management point and install a distribution point, click next

14. Then a prerequisite checker will run to verify that all the requisites for the installation are OK. If you get some warnings it´s fine, you can proceed with the installation anyway. You will probably get a warning about SQL Server process allocation and about WSUS SDK, if like me, you decide to install it later. Hit begin install, lay back and wait about 15 to 20 minutes


15. Once the installation is done, click close, reboot the Server, open the SCCM Console and enjoy, Congratulation, you have just installed you first SCCM 2012 Primary Site Server

TIP: you can view all the installation processes in real time, in your site server computer just go to \SMSSETUP\TOOLS\ on your installation media and run CMTrace tool, then open the log file in c:\ConfigMgrSetup.log, this will show you what is happening in the background during installation and let you identify potential problems in an easy way.

Great post. Very usefull. If you please have more information about how to install MAC clients and enrollment, i'll be very nice.
ResponderEliminarJust wanted to say how helpful I found this when setting up SCCM for the first time. Thanks a lot, you really helped me out.
ResponderEliminarhow to setup with high availability
ResponderEliminarExcellent and extremely detailed.
ResponderEliminarIt really helped me out
Thnx man this helped me out a lot even though i did it on sccm2012 sp1 and sql2012 sp1 but still was useful ! Only issue i had was with features installation through powershell i just added all features through server manager and it all worked like charm ! thnx again
ResponderEliminarIts a great post, the only missing bit is with the netsh firewall commands which dont work on Server 2012 and needs small modification as suggested in http://support.microsoft.com/kb/947709
ResponderEliminarGreat blog and very helpful! Do you planning additional blofs like this, for example adding WSUS services to an SCCM-Site?
ResponderEliminar